Deer Drawing - Your Creative Adventure
Have you ever felt a pull to capture the gentle spirit of a deer on paper? Maybe you've seen one in a quiet forest, or perhaps you just admire their graceful movements from afar. Bringing these creatures to life with a pencil can feel like a wonderful way to connect with nature, and it's a skill many people enjoy picking up. It's almost as if the quiet beauty of these animals calls out to our creative side, inviting us to try our hand at art.
Creating a picture of a deer, you know, can seem a little tricky at first glance, but it really doesn't have to be a big challenge. With some straightforward directions and a bit of practice, anyone can learn to sketch a deer that looks quite good. We're here to show you how to break down the process into smaller, manageable pieces, making it feel less like a complex task and more like a fun activity. It's about building confidence with each line you make, which is that little push many of us need.
This guide is here to walk you through the steps, helping you create a deer picture you'll be proud of, whether you want something cute and simple or a portrayal that feels more true to life. We’ll share some helpful hints and show you how to get started, so you can begin making your own wonderful deer pictures today. So, too, it's a good idea to gather your art supplies and get ready to create something special.
- Spyderco Knives
- Ventura County Fair
- Friends Jennifer Aniston
- Hand And Stone Massage And Facial Spa
- Caitlyn Minimalist
Table of Contents
- Getting Started with Your Deer Drawing - What Do You Need?
- How Can You Make Your Deer Drawing Look Real?
- Simplifying Your Deer Drawing Style for Easier Creation
- What Are Some Interesting Things About Deer That Help Your Deer Drawing?
- Beginning Your Deer Drawing - Where to Start?
- Adding Detail to Your Deer Drawing with Construction Lines
- Choosing Your Deer Drawing - A Fawn or a Stag?
- Finishing Touches for Your Deer Drawing - Making It Come Alive
Getting Started with Your Deer Drawing - What Do You Need?
To begin making your own deer picture, you don't need a huge collection of art supplies, which is a nice thing. A few basic items are all that's truly necessary to get going. You'll definitely want a pencil, perhaps one that isn't too dark at first, so you can make light marks that are easy to erase. Paper, of course, is a must-have; any kind will do to begin with, whether it's plain printer paper or something a little thicker for drawing. Then, to bring some life and color to your deer drawing, crayons or colored pencils are a fine choice. They allow you to add shades and textures that make your animal picture feel more complete. A black marker, while not absolutely needed, can be quite useful for going over your finished lines to make them stand out clearly, giving your artwork a more defined look. So, basically, just a few simple things are all you need to start your creative project.
Having these simple items ready helps set the stage for a relaxed and fun drawing session. It's almost like preparing a cozy spot for a good book; having everything at hand means you can just settle in and enjoy the process without interruption. You might find, too, that having a good eraser is a helpful friend, as making small adjustments is a natural part of any creative work. We’ve even put together a guide you can print out, which is that handy sheet of paper with steps you can follow right along with. This printable guide is a great companion, giving you a clear path to follow as you bring your deer drawing to life, making the whole experience feel very approachable.
How Can You Make Your Deer Drawing Look Real?
Making a deer picture that looks quite real starts with understanding some basic shapes, that's what it is. Think of it like building something with blocks; you begin with the big pieces before adding the smaller details. For a deer, this often means starting with simple forms for the main body, perhaps an oval or a rounded rectangle, and then adding circles or ovals for the head and joints. This method, sometimes called drawing from scratch, helps you get the proportions right before you commit to any specific lines. You'll learn to sketch the overall shape of the animal's body, then move on to its legs, the distinct shape of its head, and then those impressive antlers, if your deer has them. It's a bit like putting together a puzzle, where each piece fits neatly with the next.
When aiming for a more lifelike deer drawing, paying attention to the small things truly helps. This includes thinking about the way a red deer's muscles might show through its coat or the particular curve of its neck. The idea is to observe how these animals really look and move, which is that quiet study that makes all the difference. We'll guide you through adding these touches, helping you create an outline that feels genuine. You’ll find that by following a series of clear steps, you can add those fine points and textures that make your deer picture appear as if it could step right off the paper. It’s about building up the image layer by layer, which is a satisfying way to work, honestly.
Simplifying Your Deer Drawing Style for Easier Creation
Sometimes, a really detailed deer drawing can feel a bit overwhelming to start, and that's perfectly normal. Our guide offers a style that sits somewhere between a picture that looks exactly like a real deer and one that's more like a friendly cartoon. It leans a little more towards the realistic side, but you can definitely make it simpler if you want. This means you might choose to use fewer lines, or perhaps make the shapes a bit more rounded and less jagged. Simplifying the style can make the whole process feel much less like a big task and more like a quick, enjoyable sketch. It's about finding a balance that works for you, which is very important for keeping the fun in drawing.
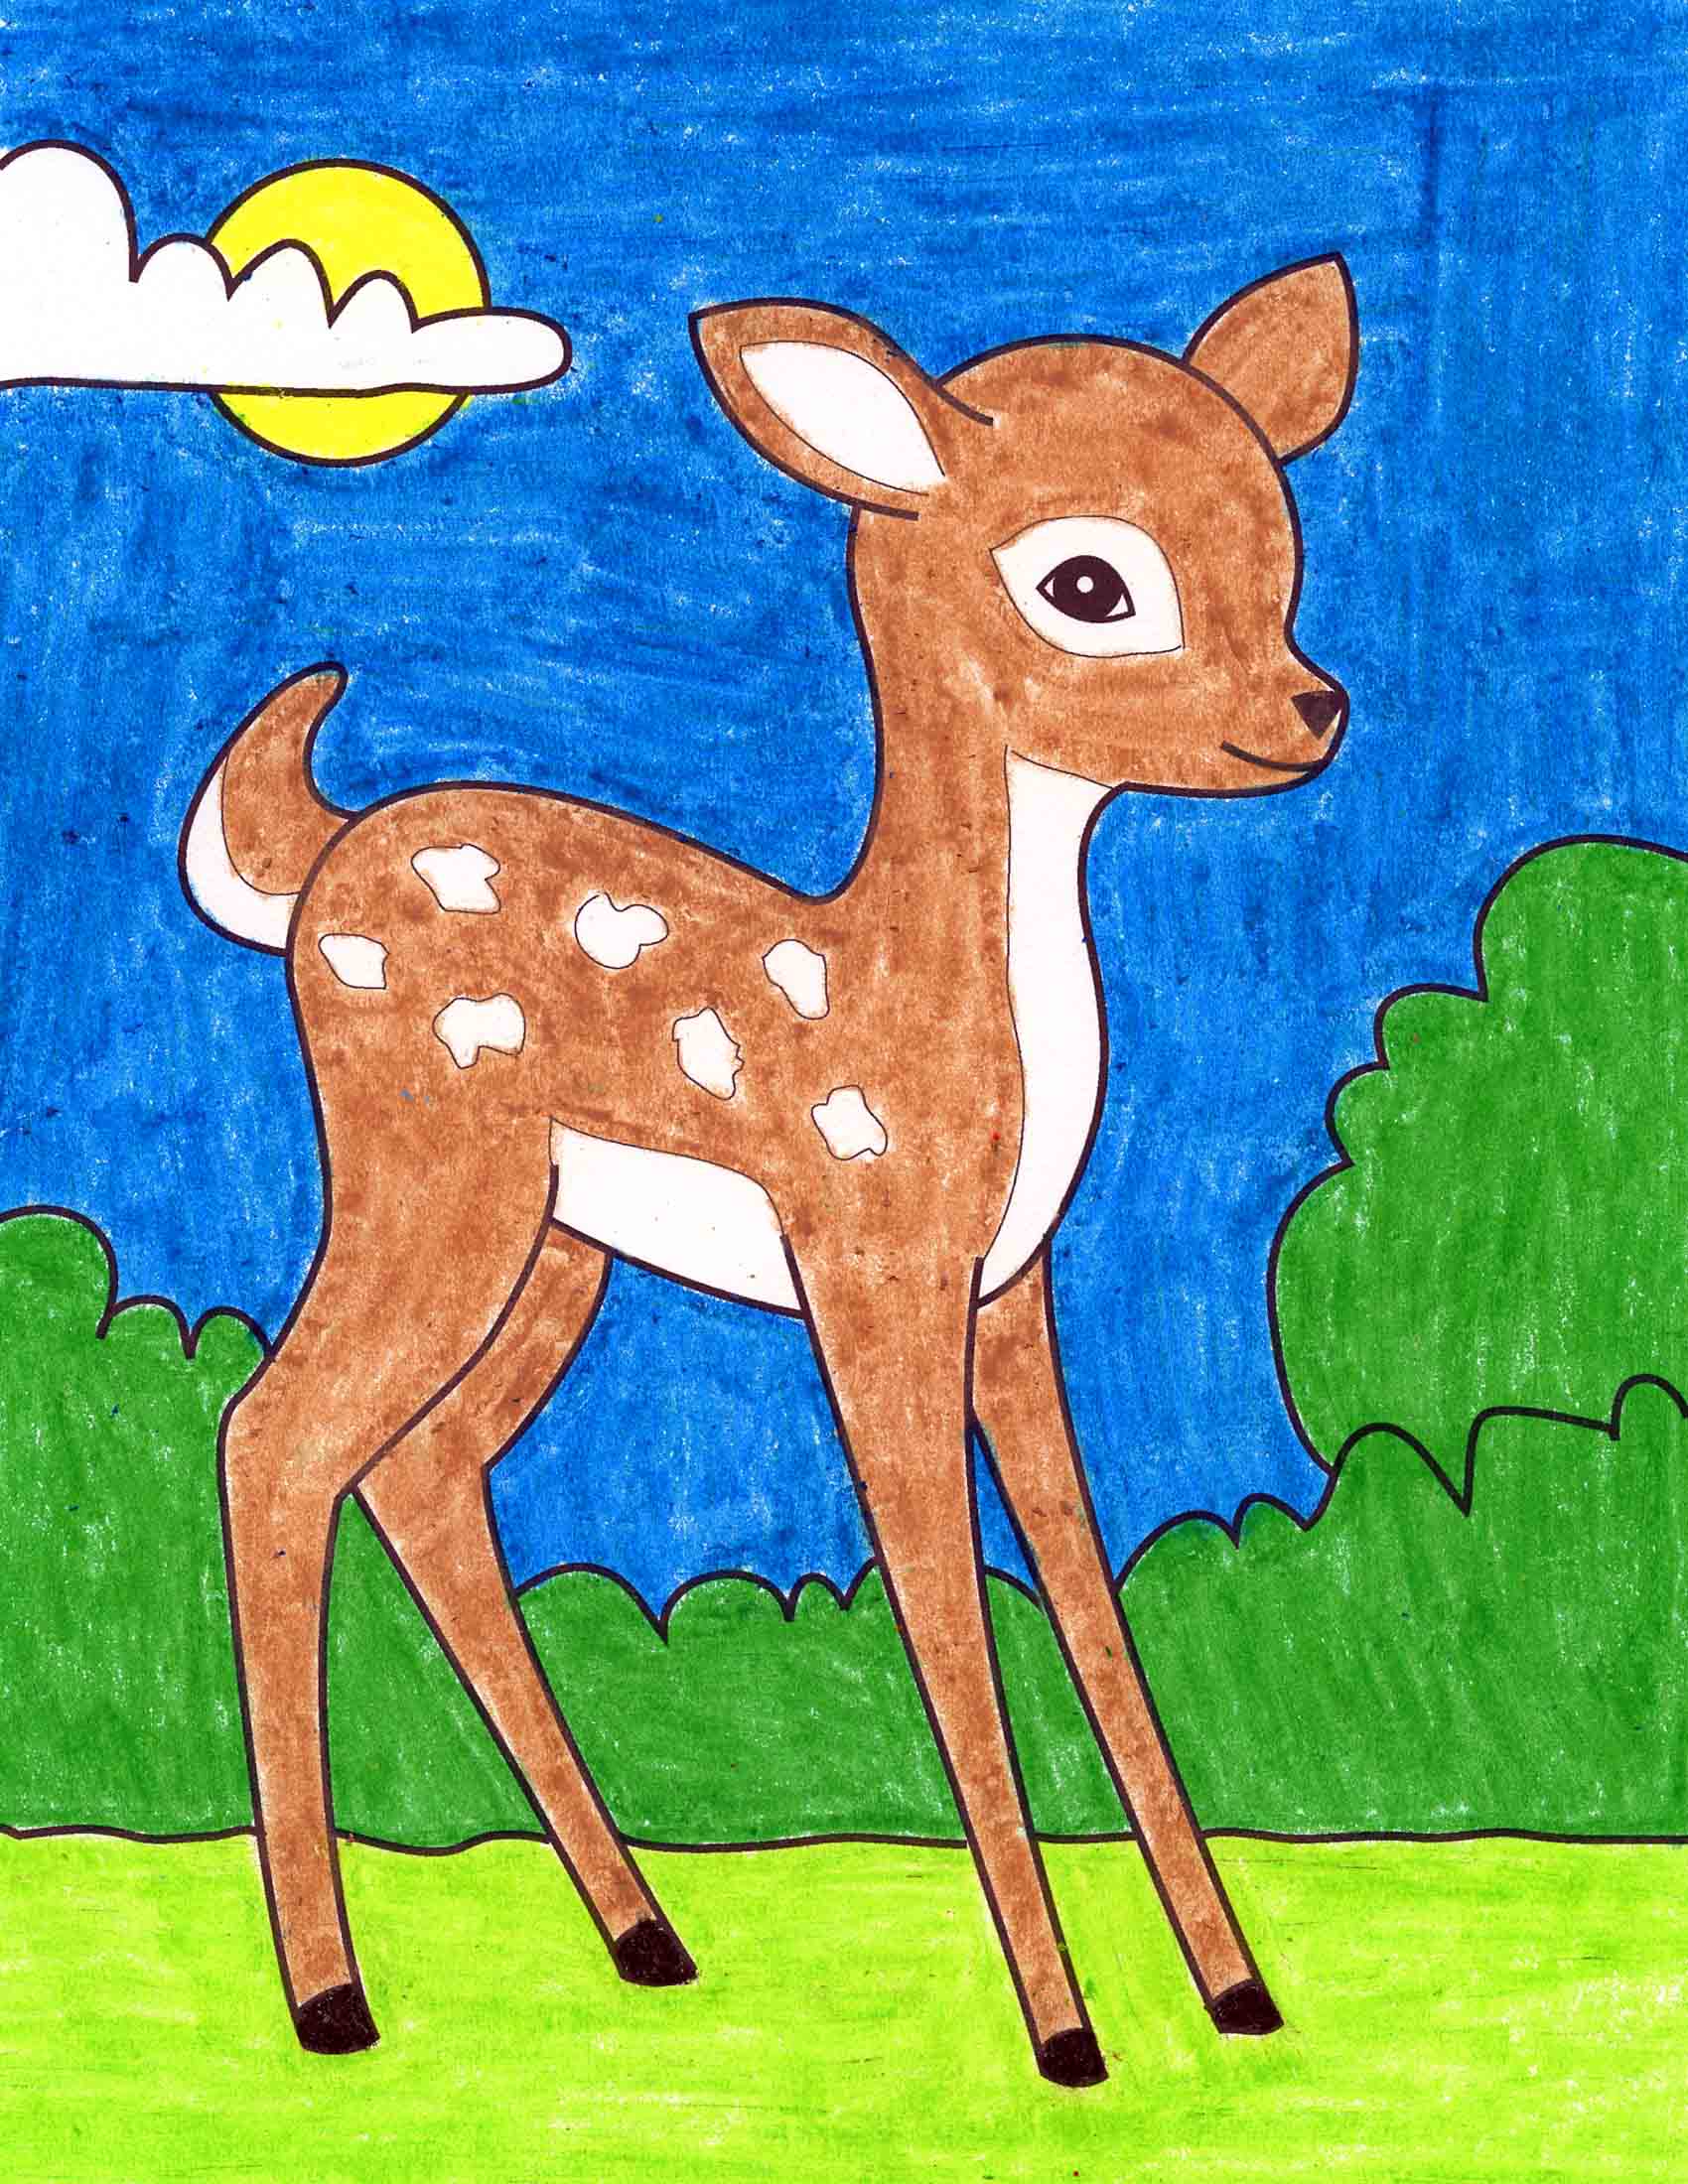
There are a few ways to make your deer drawing easier, you know. One way is to focus on just the main shapes and expressions, giving your deer a charming, simple look. For instance, if you're aiming for a cute deer, you might make its eyes larger or its head a bit rounder. This approach is really good for beginners or for anyone who wants to create something quickly without getting caught up in every single hair or shadow. We even have ways to show you how to draw a cute deer, a young fawn, a gentle doe, or a strong buck, using steps that are easy to follow. This way, you can pick the style that feels best for your current mood or skill level, which is a pretty cool option to have.
What Are Some Interesting Things About Deer That Help Your Deer Drawing?
Before you even put pencil to paper for your deer drawing, knowing a little bit about these animals can actually make your artwork better, that's a fact. Deer have senses that are quite sharp; they can smell things from far away, hear very faint sounds, and their eyesight helps them notice movement in their surroundings. They also move with a remarkable quickness through forests and open areas. Thinking about these characteristics can help you give your drawn deer a sense of alertness or movement. For example, a deer with its head slightly turned, ears perked, can convey that it’s listening carefully. This little bit of knowledge can add a lot of life to your picture, which is really what you want.
For young artists, or anyone really, these tidbits about deer can make the drawing lesson more interesting, you know? Knowing that deer are so attuned to their environment can inspire you to think about the setting for your deer drawing. Will it be standing still, perhaps nibbling on some leaves, or will it be caught mid-stride, moving through a clearing? These small details, like how they hold their heads or the way their legs bend when they run, can be reflected in your lines. It’s like getting to know your subject a little better before you start, which can make the whole creative process feel more connected and meaningful. So, too, consider how these natural behaviors might influence the pose you choose for your animal.
Beginning Your Deer Drawing - Where to Start?
When you're ready to make your deer drawing, the very first line can sometimes feel like the biggest decision, but it doesn't have to be. A good place to begin is by sketching the head of the deer. This initial shape doesn't need to be perfect; it's just a starting point, a basic form to build upon. Think of it as laying down the foundation for your picture. You might start with a simple oval or a slightly curved shape that suggests the general outline of the head. This first step helps you get a feel for the size and placement of your deer on the paper, which is quite important for the overall look. Basically, just put that pencil down and make a light mark.
After you have that initial head shape, you can begin to add the body to your deer drawing. Again, simple shapes work best here, like a larger oval or a soft, rounded rectangle for the main part of the deer's body. The key is to keep your lines light and loose at this stage. These are what we call construction lines, and they're meant to be guides, not the final strokes. They help you get the general proportions right before you start adding the more defined features. It’s a bit like making a skeleton for your drawing, providing a framework that you can then build upon with more confidence, which is a very helpful technique.
Adding Detail to Your Deer Drawing with Construction Lines
Once you have those basic shapes down for your deer drawing, you can start to give your deer a more realistic look by using your construction lines as a guide, that's the trick. These light, initial marks are your helpers, showing you where to draw the more solid, definite lines. For instance, when it comes to the antlers, you'll want to outline them with firm lines, carefully going around the lighter construction shapes you first made. This helps ensure that the antlers have a natural curve and size that fits the deer's head. It's a process of refining what you've already put down, making it more polished and true to life.
This method of building up your deer drawing from simple shapes to more complex outlines is a really effective way to create a convincing picture. You're essentially sketching the general form first, then adding the details on top. This applies to everything from the curve of the deer's back to the shape of its legs. It allows you to correct any proportion issues early on, before you've spent a lot of time on fine details. So, you know, take your time with these refining steps, as they are truly what bring your deer sketch to a higher level of finish. It’s about being patient with your artwork, which is a good quality to have.
Choosing Your Deer Drawing - A Fawn or a Stag?
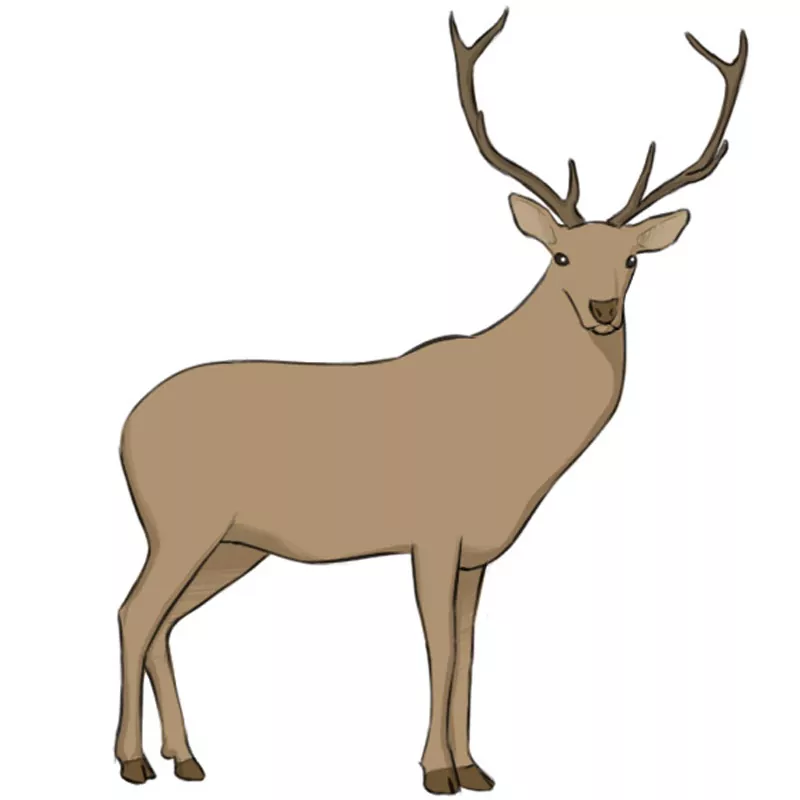
When you are making your deer drawing, you have a choice to make about the kind of deer you want to create, which is pretty cool. You can decide to leave your deer as it is, perhaps with a smaller body and no antlers, if you're aiming for a sweet little fawn. Fawns are charming with their spotted coats and innocent expressions. However, in this guide, we're focusing on drawing an adult male deer, often called a stag, so we will be adding a pair of antlers to its head. The presence of antlers really changes the character of the animal, giving it a more powerful and majestic appearance, that's what it does.
The antlers themselves offer a lot of variety for your deer drawing. Their shapes and sizes can be quite different depending on how old the deer is and what time of year it happens to be. Younger stags might have smaller, less branched antlers, while older, more mature ones can have impressive, sweeping racks. This means you have a lot of freedom to make your stag unique. You can experiment with different antler designs to give your deer its own personality. So, too, consider the season you're depicting, as that can influence the look of the antlers, making your picture more accurate and interesting.
Finishing Touches for Your Deer Drawing - Making It Come Alive
After you have the basic form of your deer drawing in place, it's time to add those important features that truly make it come alive. You'll want to draw the head on your deer sketch with more definition, giving it shape and character. Then, add the body to your realistic deer drawing, making sure the lines flow smoothly and naturally. The ears are a key part of a deer's expression, so add those, paying attention to their shape and how they sit on the head. And, of course, if you're drawing a stag, those antlers need to be carefully placed and shaped to give your deer that grand look. It's about bringing all the pieces together, which is very satisfying.
Finally, you'll add the facial features to your deer sketch. This includes the eyes, nose, and mouth, which are vital for conveying the deer's gentle nature or its alertness. These small details can make a huge difference in how your deer illustration is perceived. You might also think about the tools you use for these final touches. Colored pencils or pens can add a lovely finish, giving your deer a more vibrant appearance. If you prefer a softer, more textured look, graphite pencils are excellent for creating a sketchy feel and a wider range of shading. Stately deer are often seen as symbols of grace and the quiet beauty of the natural world in many places, and with these steps, your deer drawing can capture some of that same feeling, too, you know.
- Fox 13 Tampa
- Roland Garros 2024 Results
- Monterrey Mexican Restaurant
- Black Money Love
- American Dream Water Park
How To Draw Deer For Kids Deer Animal Drawing Step By Step Drawing
Easy Drawings Of Deer

Kansas Deer Drawing
