Spider Drawing - Simple Steps For Fun Art
Getting started with drawing can feel like a big adventure, and there's something truly special about putting a pencil to paper and seeing what comes to life. It's a chance to make something completely your own, a picture that shows a bit of what you're thinking or feeling. You might, you know, just be looking for a new hobby or a way to spend some quiet time, and sketching can be a really nice way to do that.
For many, a creature like a spider might seem tricky to sketch, yet it really doesn't have to be a big challenge. Some people might feel a bit put off by the idea of drawing something with so many legs, or perhaps they worry about making it look just right. But honestly, with a few simple pointers, you can create something pretty cool, and it's almost easier than you might think at first glance.
This guide is all about making "spider drawing" simple and enjoyable for anyone, whether you're just picking up a pencil or you've been doodling for a while. We'll go through it step by step, so you can feel good about what you're doing and, you know, end up with a picture you're happy to show off. It's really about having a good time while you learn something new.
- Genevi%C3%A8ve Bujold
- Frontier Airlines Reviews
- Monterrey Mexican Restaurant
- Tier 1 Concealed
- American Dream Water Park
Table of Contents
- Getting Started with Your Spider Drawing
- Basic Shapes for Your Spider Drawing
- What Are the Key Parts of a Spider Drawing?
- Adding Legs and Other Features to Your Spider Drawing
- Can You Make Your Spider Drawing Unique?
- Coloring and Shading Your Spider Drawing
- How Can I Improve My Spider Drawing Skills?
- More Ideas for Your Spider Drawing
Getting Started with Your Spider Drawing
Figuring out how to sketch a spider is very simple, actually. This simple guide for sketching is just right for folks who are new to drawing, or for younger artists who are, you know, just getting started with their creative ideas. You can learn how to put a spider onto paper in just a few easy stages with this step-by-step drawing lesson. It's pretty neat how quickly you can see your spider take shape on the page, more or less.
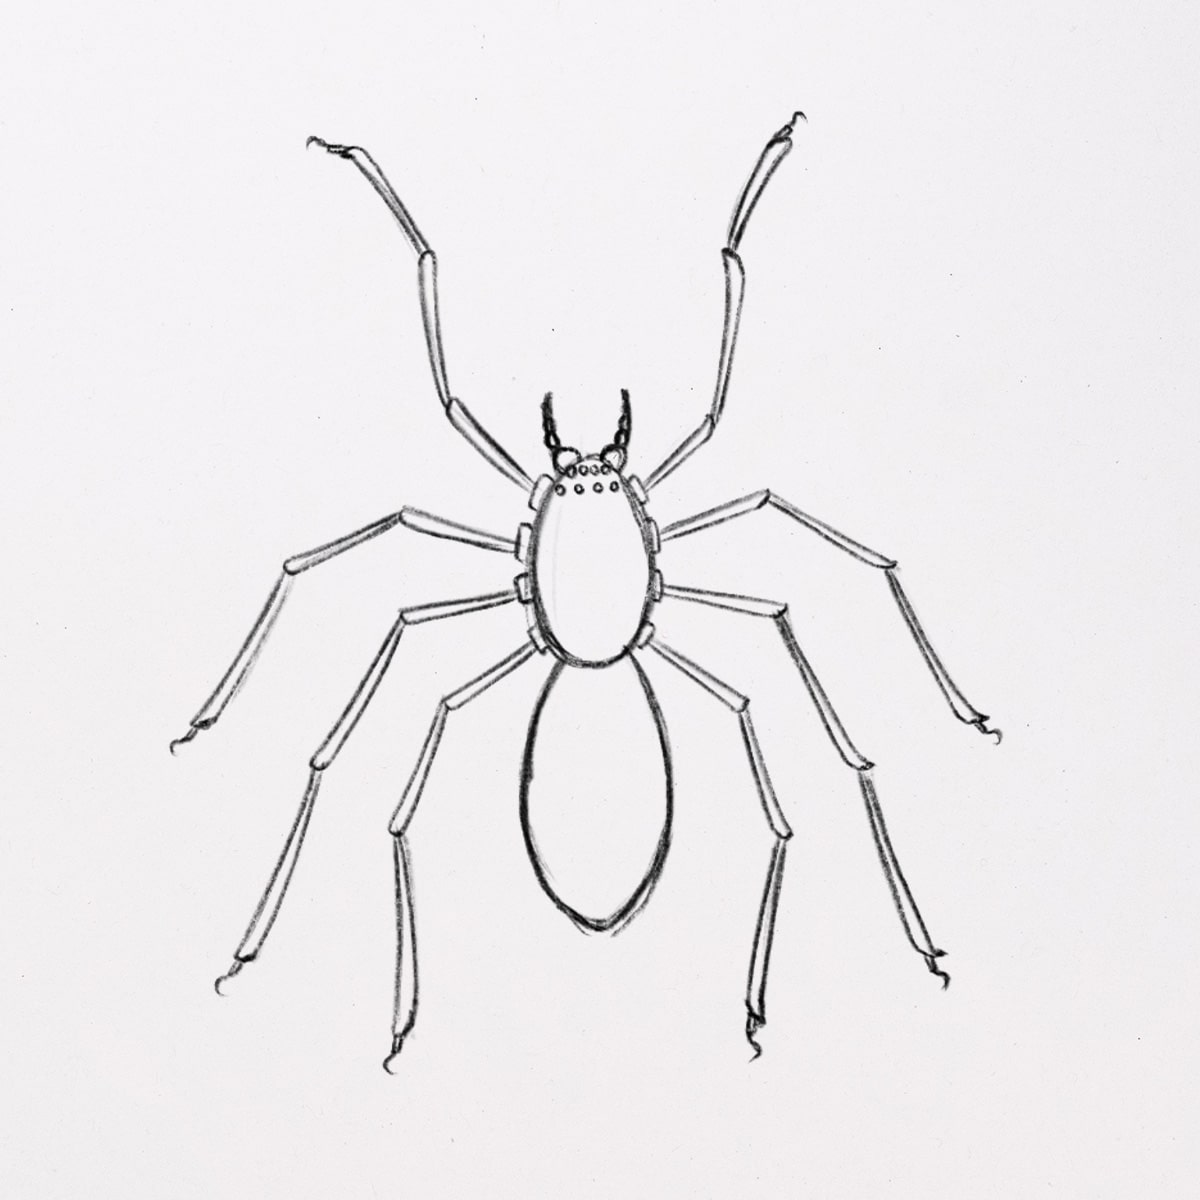
We will, you know, kick things off with the spider's back section, which is called the abdomen, in the very first part of this guide on making a spider picture. That back part of the spider, that's the abdomen, and we'll sketch it using a shape that's long and somewhat rounded, you know, like an oval. It's a pretty good starting point, and it sets the stage for the rest of your spider drawing.
In this instructional piece, we will begin with a fresh sheet of paper and, you know, find out how to create an easy spider picture in a series of steps. We will give thought to the form and size of each part of the spider, which is rather important for making it look just right. You'll see how each small step adds up to a complete picture, really.
Basic Shapes for Your Spider Drawing
To begin your spider picture, you might start with a small round shape for the spider's head, and then, you know, add a somewhat larger round shape right behind it for the main part of its body. These two simple circles, or perhaps ovals, are the very foundation of your spider, and they make it quite straightforward to get the basic outline down on paper. It's almost like building with simple blocks.
You can sketch a basic oval shape for the back part of the body, which is the abdomen, and then another for the chest area, which is the thorax. These two main shapes are really the core of your spider's body. Then, you know, you can draw an oval shape for the head, just as you might see in a picture or example. It helps to keep everything in good proportion, basically.
So, you know, you'll draw two small oval shapes for the eyes, and then you can put a smaller oval inside each of those and shade it in. This gives the eyes a bit of depth and makes them stand out. It's a small detail, but it makes a big difference in how your spider drawing looks, you know, overall. This simple technique helps bring your spider to life on the paper.
What Are the Key Parts of a Spider Drawing?
When you're making a spider picture, knowing a bit about its different parts can really help make your sketch more interesting. You can, you know, look into how a spider's body is put together, or perhaps the artistic way they make their webs, and even just simple spider doodles for a bit of fun and making new things. It's pretty cool to see how these creatures are built, actually.
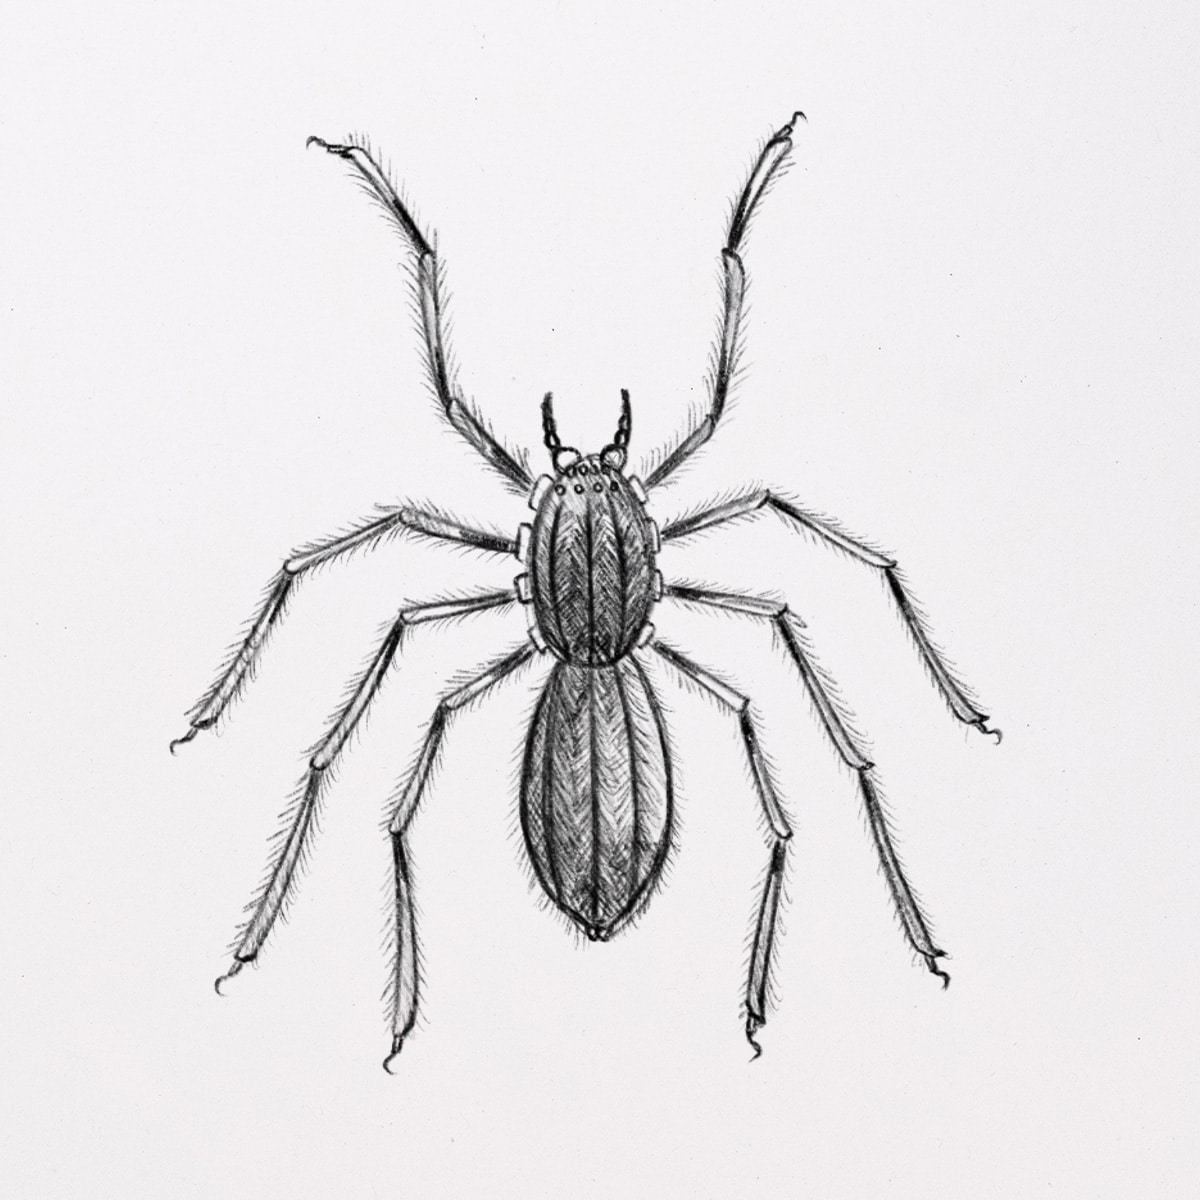
You can learn how to sketch a spider with some really amazing details by using a simple way of doing things. Just follow the clear directions and examples to make a spider that looks quite real, with its eight leg-like parts, its mouthfeelers, its seeing parts, and those silk-making bits at the back. It's honestly a lot about breaking it down into smaller, easier-to-do pieces.
To make your spider picture look more complete, you might want to add some extra bits to its head. This helps give your spider a bit more personality and makes it look more like a real creature, in a way. You could, you know, think about what makes a spider's head unique and try to show that in your drawing. It's all part of making your spider picture truly special.
Adding Legs and Other Features to Your Spider Drawing
After you have the main body shapes, you'll want to add the leg-like parts. Spiders, you know, typically have eight of these, and they come out from the main body section. You can use curved lines to create the shape of these leg-like parts, making them bend at the joints just like real spider legs. It's a bit like sketching branches on a tree, in some respects.
For some parts of your spider drawing, you might use curved lines to close off rectangular blocks on the main body and arm-like sections. This helps give a bit of form and structure to your spider. You could, for instance, think about how the segments of a spider's body fit together and try to show that with these shapes. It makes the spider look more solid, you know.
You can draw a V-shaped line at the bottom of the main body section, just above where the leg-like parts begin. This can help define the lower part of the body. And then, you know, you can put bands around the lower leg-like parts with curved lines to form the tops of any boot-like features, if you're going for a more stylized spider drawing. It's a neat trick for adding detail, really.
Can You Make Your Spider Drawing Unique?
When you're creating your spider picture, you have a lot of freedom to make it truly your own. You can, you know, choose to make it look friendly and sweet, or perhaps a bit spooky and scary, depending on what you like. And you can add color or a web for even more fun, which really brings your spider drawing to life. It's all about your own creative touch, basically.
You can learn how to sketch a spider in many different ways, from looking quite real to being more like a cartoon, with easy steps and clear examples. This means you're not stuck with just one kind of spider; you can try out various looks and feels for your spider drawing. It's pretty cool to see how different styles can change the whole feel of your picture, honestly.
Just follow the guide to put down the main shape of the body, add the leg-like parts, the seeing parts, and maybe even a web, then put some color onto your spider picture. This step-by-step approach means you can focus on one thing at a time, making the whole process less overwhelming and more enjoyable. It's a good way to build up your spider drawing piece by piece.
Coloring and Shading Your Spider Drawing
Once you have your spider drawn, putting color on it can really make it pop. You might, you know, choose to make the spider a deep, dark shade, and then make the background lighter. This helps the spider stand out from what's behind it, making it the main focus of your picture. It's a simple trick, but it's very effective for your spider drawing.
You can also find out some interesting facts about spiders and, you know, see an example of a real spider to help you decide how to put color or shade into your drawing. This can give you ideas for realistic colors or even inspire you to use imaginative ones. It's a good way to make your spider drawing not just a picture, but something that shows a bit of what you've learned, too.
When you're adding color or shade, think about where the light might be hitting your spider. This can help you decide which parts to make lighter and which to make darker, giving your spider drawing more depth. It's a subtle thing, but it really makes a difference in how real your spider looks on the page, you know, giving it a three-dimensional feel.
How Can I Improve My Spider Drawing Skills?
To get better at making spider pictures, or any kind of drawing really, practice is pretty important. You can, you know, keep trying different spiders, maybe different poses, or even different types of webs. Each time you sketch, you learn a little bit more about how your hand moves and how to get the shapes just right. It's a gradual process, but it's very rewarding.
You might want to join a group of people who also like making art and, you know, get some helpful advice from those who know a lot about it. Sharing your spider drawing with others can give you new ideas and ways to improve. It's a good way to feel supported and to keep your creative spirit going, you know, by being around others who share your interest.
Looking at other people's spider pictures can also give you lots of ideas. You can, you know, find and save ideas about spider drawing on places where people share their art. Seeing how others have approached the same subject can spark new ways of thinking for your own sketches. It's a bit like gathering inspiration from a big art book, but it's all online, basically.
More Ideas for Your Spider Drawing
Once you're comfortable with the basics, you can try making a curved line that goes back and forth over a straight spider web line. This can make your web look more realistic and give it a bit of movement. It's a small detail, but it really makes your spider drawing feel more complete, you know, like the spider is truly settled in its home.
You can also, you know, look at more ideas about spider drawing and spider art. There are so many different ways to show a spider, from very simple sketches to really detailed works. This can help you expand your own style and find new things you enjoy drawing. It's a fun way to keep your artistic journey interesting and fresh, really.
Consider trying out different angles for your spider drawing. Maybe one looking down from above, or another from the side. This can help you get a better sense of the spider's shape and how it moves. It's a good way to challenge yourself and, you know, push your drawing skills a little further, making your spider pictures even more dynamic.
This guide has walked you through the simple steps of creating a spider drawing, from starting with basic shapes like circles and ovals for the head and body, to adding more intricate parts like legs, eyes, and spinnerets. We've talked about how to make your spider look cute or scary, how to add color and webs, and how to explore different drawing styles from realistic to cartoon. We also touched on how looking at spider anatomy and other artists' work can help you improve your own sketches, and how to add details like shading to make your spider drawing stand out.

How To Draw A Realistic Spider
How to Draw a Spider (with amazing details) 🕷️
How to Draw a Spider (with amazing details) 🕷️
