Unlocking The Art Of Bike Drawing - Your Creative Ride
Ever thought about sketching out a bicycle, but maybe felt a little unsure where to even begin? Well, you are certainly not alone in that feeling, and honestly, it is actually a very common thought. There is something truly special about putting pen to paper and seeing a familiar object like a bike come to life through your own hand, isn't there? It is a wonderful way to express yourself, and it really does not have to be as tricky as it might seem at first glance.
We are going to take a pleasant little spin through the process of making your very own bike drawing, exploring how simple it can truly be to get those wheels turning on your page. Whether you are just picking up a pencil for the first time with this kind of project or you are looking for some fresh perspectives on an old favorite, we have got some friendly pointers coming your way. It is all about finding the right approach that feels good to you, and, you know, just having a good time with it.
So, get ready to discover how straightforward it can be to create a fantastic looking bicycle. We will be sharing some simple ideas and easy steps that can help you sketch out everything from the sturdy wheels to the graceful frame, making the whole experience pretty enjoyable. It is sort of like going on a relaxed bike ride, but instead of pedaling, you are just gently moving your hand across the paper.
Table of Contents
- Getting Started with Your Bike Drawing Adventure
- What Simple Shapes Help with Bike Drawing?
- Breaking Down the Bike Drawing into Steps
- How Can You Make Your Bike Drawing Look Real?
- Beyond the Basics - Customizing Your Bike Drawing
- Tips for Beginner Bike Drawing Artists
- Exploring Different Bike Drawing Styles
- Ready to Roll - Your Next Bike Drawing Steps
Getting Started with Your Bike Drawing Adventure
Beginning a fresh sketch, particularly when it involves something like a bicycle, can feel like a rather exciting prospect, can't it? It is a bit like setting off on a short trip. You might think that drawing a bike requires some kind of special talent, but the honest truth is that it is often about following a few easy ideas and just letting your hand do its thing. For instance, some folks find it incredibly helpful to watch others create, like when you see a friendly guide from a place like Art for Kids Hub, where someone named Austin, and another person, might show you exactly how they put their bike drawing together, piece by piece. It is a very visual way to learn, and it sort of takes the guesswork out of things, which is nice.
There are, in fact, quite a few ways to approach making a picture of a bicycle, and that is part of the fun, actually. You could, for example, try sketching a bike in a couple of different looks, maybe even three distinct appearances, to see what you enjoy the most. Some people like a more traditional feel, while others might prefer something a bit more playful or even cartoonish. The real point here is that learning how to make a truly pleasing bike drawing does not have to be a big puzzle. With some straightforward directions and perhaps a video demonstration to watch, you can usually find your way quite simply. It is about discovering what clicks for you and, well, just enjoying the artistic ride, you know?
By simply keeping to some pretty clear actions, you, too, can quite readily produce a rather excellent bike. It is a matter of building confidence with each mark you make. You might start by learning how to make a bicycle with wheels that look quite sturdy, or perhaps some nice fenders and a set of handlebars that feel just right in a lesson made for those who are new to art. This way of learning tends to build your skills bit by bit, making the whole experience feel very achievable. So, really, the first step is often just deciding to give it a go, and then, you know, seeing where your creative energy takes you.
What Simple Shapes Help with Bike Drawing?
When you are thinking about how to get a bike drawing started, one of the most helpful things you can do is to think about the basic forms that make up a bicycle. It is a bit like looking at a building and seeing the simple blocks it is made from. You might, for example, begin by drawing the very front wheel of a cartoon bicycle. And how do you start that? Well, typically, you just begin with a small circle. That little circle, you see, is often the very center of the wheel, the hub, where everything else connects. It is a pretty fundamental starting point, honestly, and it makes a lot of sense.
From that initial small circle, you can then extend a couple of lines that curve gently upwards. These lines, in a way, sort of give shape to the wheel itself. And at the top of these curved lines, you can put a small, rounded shape that looks a bit like a trapezoid. This helps to define the top part of the wheel, giving it some character. This approach, you know, of using these simple geometric shapes, can make what seems like a rather complex object much more approachable. It is about breaking it down into manageable bits, which is always a good idea when you are trying to draw something new.
To make your bicycle's tires, for instance, you could simply draw a circle. You might use a compass if you have one, or you could even just trace around any small, round object you have nearby to get that perfect circular shape. Then, you know, for the front tire, you could place it right under a slanted rectangular shape in such a way that one end of the rectangle sits right at the middle of the circle. This method of using these basic forms, like circles and rectangles, as sort of guides, makes the initial outlining of your bike drawing much less daunting. It is a pretty clever trick, actually, and it really helps to lay a solid foundation for your sketch.
Breaking Down the Bike Drawing into Steps
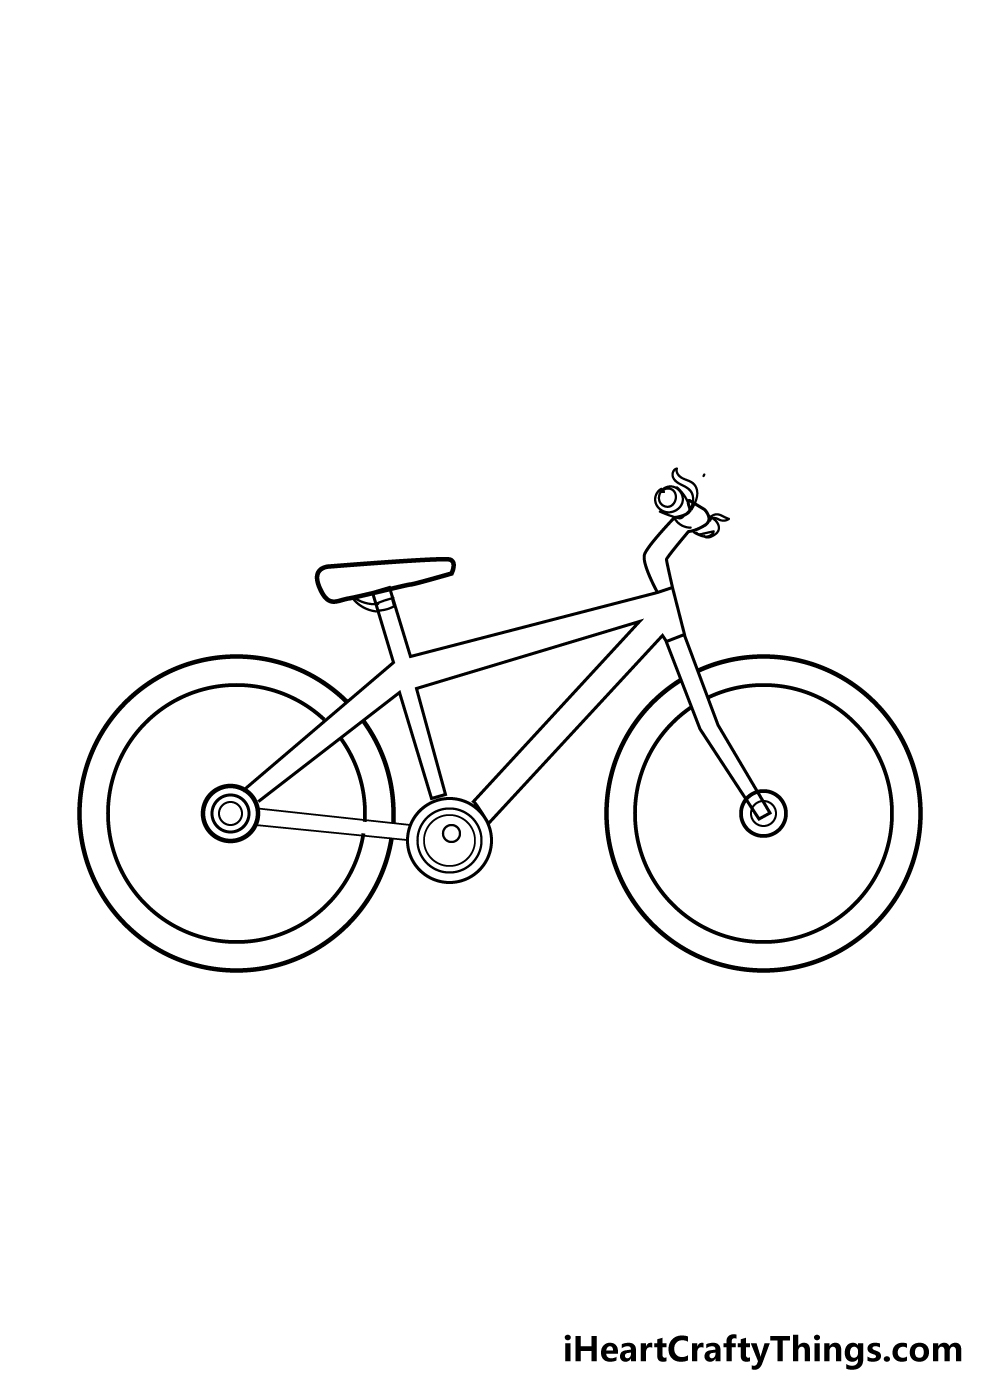
So, once you have a handle on those basic shapes, the next bit for your bike drawing is to really break down the whole process into a series of clear, smaller actions. It is a lot like putting together a model, piece by piece. For example, some tutorials will walk you through eight distinct steps to get your bicycle picture just right. These steps typically involve sketching out the wheels first, then moving on to the main frame, adding the seat, getting the handle position right, drawing the chain, putting in the pedals, detailing the spokes, and finally, adding some color to your bike. It is a very structured way to go about it, and it usually works out pretty well.
You might start by drawing a line that goes diagonally from the center of each of your three circles, perhaps towards the upper left side, using your pencil. This kind of guiding line, in some respects, helps you to position the parts of the bike correctly. Here, too, having a sort of template or a reference picture can be really helpful, as it gives you a visual cue for where everything should go. It is like having a map for your drawing, which, honestly, makes things a lot easier than just guessing. This initial rough sketching is a really important stage, as it sets up the whole structure of your bike drawing.
After you have got that basic shape of the bike frame in place, using your pencil to mark out where the handlebars, the saddle, the luggage rack, the pedal arm, and the chain will sit, you will find that your bike is now available as a rough line drawing. This is a pretty exciting point, as you can really start to see your creation taking shape. Then, you know, you can swap out your regular pencil for a drawing pencil, which often gives you a darker, more defined line. With this, you can then draw the bike frame, the saddle, the handlebars, the chain, and the luggage rack, following your template. You will also, you know, put in the pedals, the steering wheel grips, and the light. This step-by-step method, really, makes the whole bike drawing process feel very manageable, even for someone who is just starting out.
How Can You Make Your Bike Drawing Look Real?
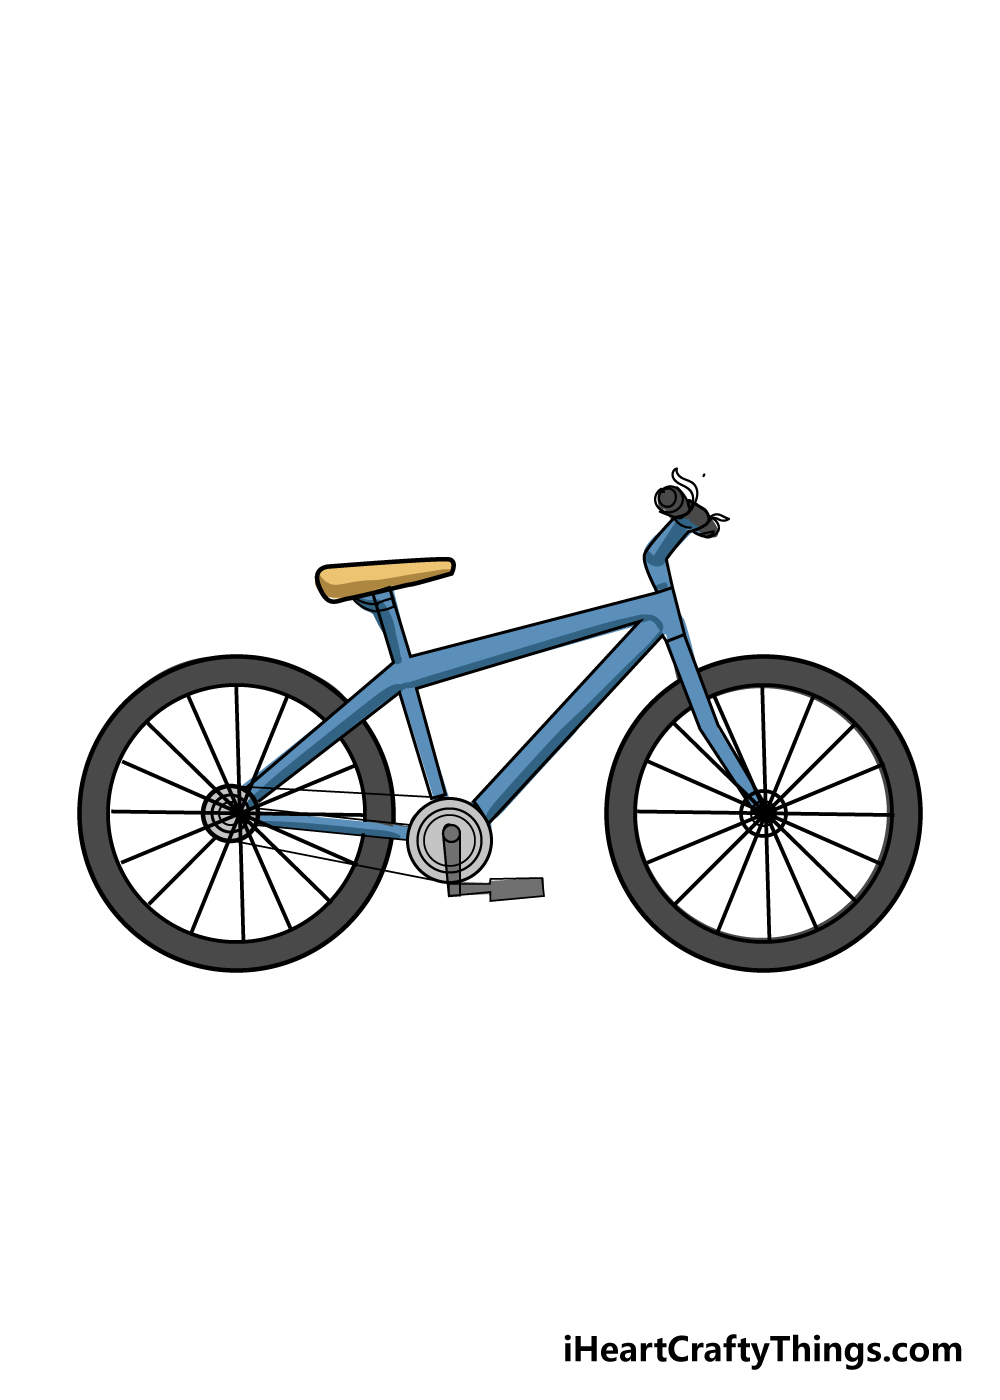
Making your bike drawing look like it could, you know, actually roll right off the page is often about adding those smaller, yet very important, little details. It is a bit like adding the final touches to a dish that make it truly special. To give your bicycle sketch a more lifelike appearance, you could certainly put in things like spokes on the wheels. These thin lines radiating from the center really do make a big difference in how the wheels are perceived. And then there are the brake pads on the wheels, which, honestly, add another layer of realism and functionality to your bike drawing. These are the kinds of elements that people often notice, even subconsciously, that make a drawing feel more complete.
Beyond the basic mechanics, you can also, you know, add little decorative touches, like decals or even logos, to truly make your bike unique to your vision. It is a way of personalizing your creation, giving it a bit of your own style. Think about the handlebars, the saddle, and the luggage rack; these parts, when drawn with a bit of care, really contribute to the overall feel of the bicycle. And do not forget the steering wheel grips or the light; these are the smaller components that, when included, tend to make the bike drawing seem much more finished and authentic. It is those tiny bits that, in some respects, truly bring the whole picture together, making it feel less like a simple outline and more like a bicycle that is ready for a ride.
Beyond the Basics - Customizing Your Bike Drawing
Once you have got the main structure of your bike drawing down, and you are feeling pretty comfortable with it, you might start thinking about how to make it truly your own. This is where the fun really begins, in a way, because you get to play around with different looks. For instance, some really fun ways to make your bike stand out could involve adding racing stripes. Imagine a bright, bold stripe running along the frame – it instantly gives the bike a sense of speed and excitement, doesn't it? Or you could go for some very vibrant colors, making your bicycle pop with personality. It is about taking that basic outline and giving it a distinct character, which is pretty cool.
This idea of customization, you know, is not just about making your bike drawing look good; it is also about expressing yourself. You might want your bike to look sleek and fast, or perhaps sturdy and ready for any adventure. And for those who are just looking to start with a very simple bike drawing, you are certainly in the right spot, as the foundation is key before you add all the extra flair. It is a bit like how in a game called Free Rider HD, where you race bikes on courses drawn by other players, you get to see how different designs and lines can create entirely new experiences. It is a pretty neat connection, actually, between drawing and play.
That game, Free Rider HD, is actually quite a good example of how creativity can extend beyond just drawing a static image. You can find thousands of really excellent tracks to race on, or, you know, you could even draw your very own. This shows how your bike drawing skills can be applied in different, interactive ways. So, whether you are adding some cool decals, or maybe a unique pattern to the frame, or even just picking a really unusual color scheme, remember that personalizing your bike drawing is a fantastic way to make it truly yours. It is about letting your imagination take the handlebars, so to speak, and just going for it.
Tips for Beginner Bike Drawing Artists
For anyone who is just starting out with making a bike drawing, there are a few really helpful ideas that can make the whole process feel much smoother. It is a lot like learning to ride a bike yourself; you start with some simple guidance. One of the most important things to keep in mind is to focus on getting those sturdy wheels right, along with the fenders and the handlebars. These are often the first parts that people notice, and getting them to look solid can make your entire drawing feel more grounded and, well, believable. It is a pretty good place to put your attention early on, honestly.
You will find that many tutorials, particularly those aimed at people who are new to drawing, offer instructions that are very simple and quite clear, often with good examples to follow. This kind of straightforward guidance is incredibly valuable, as it removes a lot of the confusion that can sometimes come with learning something new. If you are watching a video tutorial, for example, it is often a good idea to just pause the video at every step. This gives you plenty of time to really understand what is happening and to make your own marks without feeling rushed, which is actually a pretty effective way to learn.
Using templates can also be a huge help when you are first trying your hand at a bike drawing. These can provide a basic outline or guide shapes that you can then build upon. For instance, you might use a pen and a ruler, along with those guide shapes, to start drawing the main frame of the bike. The shape you are trying to create might look a little complicated at first glance, but if you stick with the guide shape from the previous step and refer to a clear image, you will likely find that you can do it quite easily. It is about building confidence through small, achievable steps, and that, you know, is a pretty solid strategy for any beginner artist.
Exploring Different Bike Drawing Styles
One of the really neat things about creating a bike drawing is that there is no single "right" way to do it. Just like bicycles themselves come in many shapes and sizes, your drawings can too. You could, for instance, learn how to make a bicycle with the help of a drawing guide that focuses on a particular look, maybe a more playful, cartoon-like appearance. Or, you know, you might prefer a style that leans towards something more realistic, trying to capture every little detail. It is pretty cool how much variety you can bring to your work, honestly, and it keeps things interesting.
Some guides will even show you how to draw a bicycle in three distinct styles, which is a fantastic way to stretch your creative muscles. This allows you to experiment and find what kind of aesthetic really speaks to you. You might discover that you really enjoy the simplicity of a cartoon outline, or perhaps you prefer the challenge of adding intricate spokes and brake pads to make your bike drawing look more true to life. It is about exploring different artistic avenues and seeing where your preferences lie, which is a very personal part of the creative process.
Whether you are aiming for a very easy bicycle for kids, perhaps a simple step-by-step guide that is just right for beginners, or something more advanced, the key is often in the exploration of these varied styles. You can find so many ideas about bike drawing on platforms like Pinterest, where people share all sorts of interpretations and techniques. This kind of visual inspiration can be incredibly helpful, giving you fresh perspectives and encouraging you to try new things with your own sketches. It is a bit like having a huge gallery of ideas right at your fingertips, and, you know, that is a pretty wonderful resource to have.
Ready to Roll - Your Next Bike Drawing Steps
So, you have gotten a good handle on sketching out a bicycle, and you are probably feeling pretty good about your bike drawing skills. What comes next, you might wonder? Well, the creative journey really does not have to stop there. For instance, you could even download a bike coloring page. This is a lovely way to keep engaging with the subject, even if you are not drawing from scratch. It allows you to play with colors and shading, which is a whole other dimension of artistic expression, and it is, honestly, quite relaxing.
Beyond just coloring, you can also explore more fun projects that involve different ways of getting around. If you enjoyed drawing a bicycle, you might find that sketching other forms of transportation is just as enjoyable. Perhaps you could try outlining the shape of a motorcycle next. In the first step for a motorbike, you might need to position it on the ground and then outline its general shape, including its wheels and frame. Then, you know, you could continue to outline the main parts of the motorbike, just like you did with the bicycle. It is a very similar process, which makes it feel quite familiar.
Or, you could even try your hand at drawing a cartoon car, pausing a video at every step to make sure you get all the details right. The skills you have gained with your bike drawing, like plotting width and height, outlining the frame, and adding details for handlebars and saddles, are really quite transferable to other subjects. You can also, you know, focus on drawing the rims and chain rings, or getting the bike seat, pedals, and handlebar grips just right. It is all about building on what you have learned and keeping that creative momentum going. There are so many possibilities out there for what you can sketch next, and it is, honestly, a pretty exciting thought.
This article has taken us through the delightful process of creating a bike drawing, starting from the very first simple shapes to adding intricate details and exploring various artistic styles. We discussed how breaking the drawing down into manageable steps, like sketching wheels, frames, and handlebars, makes the task less daunting for beginners. We also touched upon ways to make your bicycle look more realistic by including spokes and brake pads, and how personalizing your sketch with racing stripes or unique colors can add a special touch. Finally, we considered how these newly acquired skills can open doors to drawing other forms of transport and continuing your creative journey.
Bike Drawing - How To Draw A Bike Step By Step
Bike Drawing - How To Draw A Bike Step By Step

Bike Drawing » How to draw an Bike Step by Step
